

Cast Iron 101
"Bueller? Bueller." Ahem-class is officially in session for our cast iron cult! Learn how to properly clean, store, and cook in our virtual Cast Iron 101 class. The best part? All the information is right here at your fingertips. Find out why you need to be cooking in cast iron, how you can bring your rusted pieces back to life, the simplicity of charcoal briquettes, and more in our Cast Iron 101 crash course.
Why Cast Iron
Cast iron is the darling of the culinary world. It's versatile, timeless, made from high-quality materials, holds heat unlike any other pan, and not to mention-it's tough as nails. Cast iron will last you a lifetime if you give it a little TLC from time to time in the form of cleaning and seasoning. Plus, its natural non-stick surface makes it a go-to item on the stovetop, in your smoker, or sitting under your crackling campfire.
Cleaning
There are many different opinions on whether or not to use soap while cleaning. If you do plan to use soap, then we highly suggest that you re-season at the end of each clean.
Campsite Clean/Minimal Resources
1. If you have minimal resources available to use Chef Jack recommends lining the bottom of the cast iron pan with kosher salt to loosen food particles and pull moisture out of the pores of your cookware.
2. Let it sit for an hour.
3. Take a rag and wipe the salt around, then dump it.
If you want to get really rural with your cast iron cleaning, check out how Cee Dub cleans cast iron in the wilderness.
For Light Cleaning
If there isn't any baked-on food particles or sticky residue, then follow these instructions for cleaning your cast iron.
1. While the cookware is still warm (not hot) rinse with hot water.
2. Use a stiff-bristled brush to scrub the inside, removing any remaining food bits.
3. Pat dry with a towel and let sit in an open-air rack.
4. If the finish looks black and shiny, you're all done! If the finish is starting to look marbled, dull, or gray, then you can spritz the surface a few times with our Cast Iron Conditioner. Dab the conditioner into the cast iron with a paper towel or lint-free cloth.
For Heavy-Duty Cleaning
1. Remove all food particles from your cast iron cookware using a plastic pan scraper or one of our chain mail scrubbers. A chain mail scrubber works really well because it's tough enough to remove stubborn food (and even rust), but it won't scrape off your cast iron's finish.
2. Fill the dish with hot water and add about 2 teaspoons of Cast Iron Cleaner. Rub the cleaner in with a plastic brush or clean rag. If you're dealing with stubborn or burnt food, let the pan sit with the water and cleaner for about 10 minutes, then scrub. You can also try boiling the water to loosen any residue.
3. With a stiff-bristled brush, (never with a stainless steel scrubber) scrub the remaining food bits away and off the iron. Rinse well and pat dry with a towel.
4. While the dish is still warm, spritz all surfaces a few times with our Cast Iron Conditioner (mentioned above) and dab it around with a clean paper towel or lint-free/micro-fiber cloth. Congratulations, you've just cleaned and seasoned your cast iron cookware.
Chef Jack's Cast Iron 101 // Cleaning & Seasoning
Seasoning
Seasoning your cast iron is vital to the upkeep. It prevents rust and promotes that natural, non-stick finish that we mentioned above. The term seasoning can refer to the finish of the cookware as well as the continuous process of maintaining the said finish. Seasoning should be done at the very end of your cleaning process. After you've patted your cast iron dry with a towel, you should immediately re-season while the dish is still warm. As stated above, simply spritz the surface area a few times with Cast Iron Conditioner and dab it around with a clean paper towel or lint-free cloth. That's it! If you find that your cast iron piece feels a bit sticky or saturated, place your cast iron upside down on the top baking rack of your oven and turn the temperature to 450F and warm for about an hour. Let it cool and you should be good to go.
If you don't have Cast Iron Conditioner on-hand then any cooking oil such as peanut oil, canola oil, soybean oil, or vegetable oil will work just fine. Start with a small amount and begin to spread on the entire cast iron surface with a micro-fiber cloth.
Re-Seasoning, Restoring, & Rust Relieving
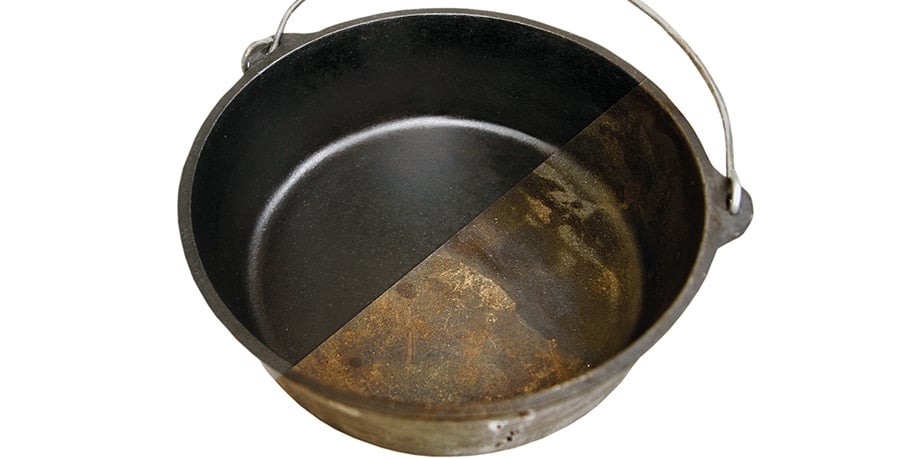
If you scour internet sales or garage sales, you'll likely come across a nasty, rusted out cast iron piece for CHEAP. Buy cheap and bring that beauty back to life. Yes, you heard that right. There is still hope! You just need to put in a little work.
1. We'll start by baking off the old seasoning. First, heat up your cast iron piece in an oven on the self-cleaning setting. This process will help to strip the seasoning. If your oven doesn't have a self-clean setting, heat your cast iron to 450°F for 1-2 hours. Remember how we said cast iron holds heat well? Well, be sure to let the cast iron cool a bit before handling. We recommend still using heat guard gloves for precautionary reasons.
2. Afterwards, Chef Jack will boil water in the dutch oven and use a flat edge spatula to scrap off the bits. Pour the water out and dry.
3. Use a steel wool pad or pan scrapper to scrub the rust off the surface of the cast iron. In extreme cases, you could use a wire wheel brush on a drill to clean the rust away. Keep scrubbing until the rust and stains have been removed before you continue to the next step.
4. While the cast iron is still warm, apply a thin coat of Cast Iron Conditioner or food-grade oil and spread using a paper towel.
5. Finally, place the cast iron piece upside down into a pre-heated oven, grill, or smoke vault, and bake it at 450°F for another 30 minutes to allow the cast iron to absorb the oil.
6. Cool before storing in a dry place.
Chef Jack's Cast Iron 101 // Restoring
Cooking with Charcoal Briquettes
Are you more of a campsite cast iron cooker and have wondered how many charcoal briquettes to use with your dutch oven? The first thing you need to assess is the size of your dutch oven. At Camp Chef there are four universal sizes which are typically labeled on your dutch oven-10-inch, 12-inch, 14-inch, or 16-inch. Bear in mind that weather, cooking methods, food, and even elevation can play largely in how many briquettes it takes to heat your dutch oven.
The math is fairly simple. In order to guesstimate how many charcoal briquettes you'll need, take the size on the lid and multiply it by two. For example, if you have a 12-inch dutch oven-12 x 2 = 24 (charcoal briquettes.) Seems easy, right? To get an even cook you'll need to place briquettes around both the top and bottom of your dutch oven. The placement of briquettes is key. Place them on both the outer rim of the lid and directly underneath the dutch oven in the form of a circle.
As we said earlier, your cooking method and dinner contents will dictate how you strategically divvy up your charcoal briquettes.
Baking: Majority (75%) of the briquettes are placed on top the dutch oven and the rest (25%) on the bottom. We do this to ensure that the contents within the dutch oven do not burn.
Frying/Simmering/Boiling: Majority (80-100%) of the briquettes will be placed underneath the dutch oven for a more concentrated heat.
Keep in mind that you may lose a considerable amount of heat if you are placing the dutch oven and briquettes directly on dampened ground. If you plan to cook directly on the ground during these conditions try bringing a disposable/inexpensive tin pan to place underneath your dutch oven. That being said, we suggest cooking on a dry surface or even purchasing a Camp Table to assure your charcoal briquettes do not extinguish. Read the entire blog post here.