Why European Mounts
Just like you, we're itching to get back out in the stand, sporting our favorite colors—camouflage and/or blaze orange. We're ready for those pulse pounding moments of securing a monster in our cross hairs. But, knowing how to clean, butcher, preserve, serve, and display your harvest are action items that need to be addressed ahead of time.
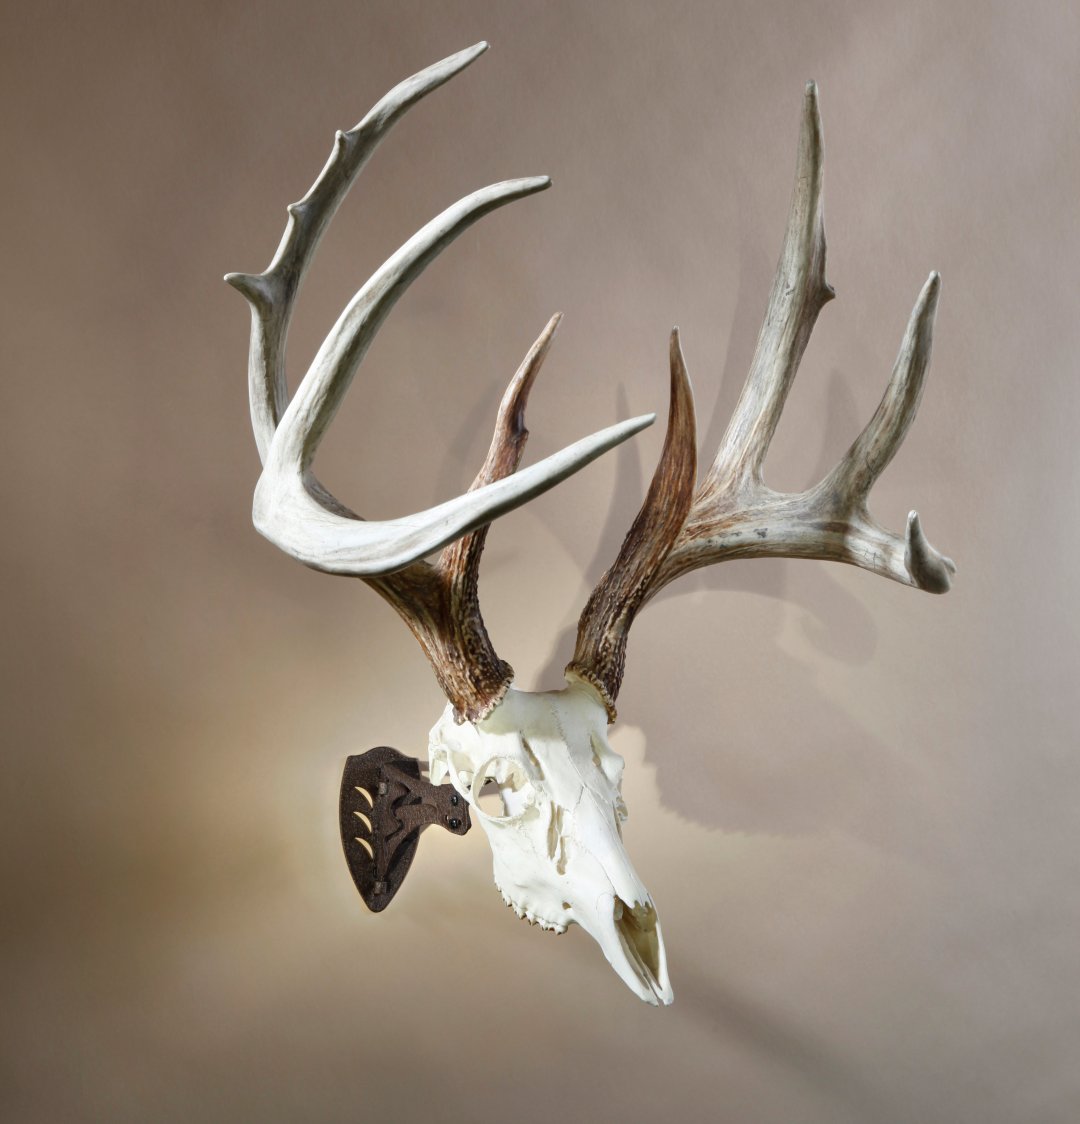
There are a number ways to display your season's trophy in a sustainable manner. Perhaps the most popular method—the shoulder mount, will give you the most realistic outcome. However, at a well-established taxidermist, shoulder mounts can also cost upwards of $700. On the contrary, a Euro mount is inexpensive, can be done at home, and supports sustainable hunting by using the animal's entirety. Follow along as we make a European skull mount.
How to Make Your Own Euro Skull Mount
-
Products You Will Need
-
- •Butchering knife set
- •High Powered Outdoor Cooker
- •Large Aluminum Stock Pot
- •Washing Soda, 1/2 cup / gallon of water used
- •Heat Resistant Gloves
- •Hose with jet spray setting
- •Bleach or Whitening Agent, Optional
- •Basting Brush or Paint Brush
- •Skull Hooker for display
-
Instructions
-
Boil with CAUTION. Boiling too long may result in nose bones coming off.
- While you're harvesting your deer, separate the head from the body so that you can begin to work on the skull. With your hunting knife, carefully skin the head by removing the hide, fat, and flesh off the skull. Pro Tip: we do this step as we are harvesting the deer in the field or back at camp. The longer you wait to remove the flesh, the more difficult it is to clean and whiten since it discolors the bone.
- Continue your dissection by removing the eyes, tongue, connective tissues, and brain matter as best as you can. Be strategic when doing this. You may need to concoct a tool to scrape out the gray matter such as a hanger. Use the hole where the spinal cord enters the base of the head. After you've finished, let the skull dry out a couple hours in the sun.
- Next is the boiling process. Right now, the skull appears brown and rather discolored—this is normal and will be remedied during the whitening process. Fill a medium to large stock pot with water (just enough to cover the skull, not the antlers), add in your Washing Soda, place on your cooking system, and bring to a rolling boil over medium to high heat. Boil for 30 minutes. Monitor this to ensure the entire skull remains below the water line.
- Remove from the pot. There may be some tissues and particles left on the skull. (This is fine.) Spray the skull with a jet hose setting, working around the nooks, crannies, and cavities. Be prepared. This can be a dirty job especially when cleaning the spinal cord opening.
- With a fresh batch of water, boil the skull again (30 minutes.) Repeat the boiling and jet spraying process up to three times, until the skull is completely clean.
- This step is optional. If your skull is not as white as you'd like you can take a basting brush and brush the skull's entirety with the bleach or whitening agent. If you choose to do this step, make sure to get the front, back, sides, and creases, all while avoiding the antlers at all costs.
- Bring it outside and hang it in the sun for 24 hours. You can repeat this process of painting and drying in the sun up to three times. Be weary of where you hang your skull as animals may be prone to walk off with your hardwork.
After you've whitened your skull—it's time to show it off! Use a Skull Hooker to effortlessly mount to your prize to the wall. The Little Hooker® is the perfect size for housing mid-sized European skulls and game such as hogs, aoudad, alligator, black bear, deer, antelope and exotic medium game such as gazelle, and impala just to name a few. Your fall harvest will be the conversation piece at every gathering.