
THE BOOK OF PIZZA
Rome, Naples, Chicago, New York--everyone claims to hold the title of "the best pizza", But, we all know the best pizza is one that's customized to your personal taste. Create a personalized, authentic, bistro-like 'za right from your home or campsite with the help of Camp Chef's Book of Pizza.
Chapter Links
ANATOMY

Pizza anatomy is as basic as it comes. The bottom layer is always some sort of dough or dough substitute. Followed by a layer of sauce and a variety of toppings. Pizza is completely customizable to the consumer. Make it however you'd like-vegetarian, vegan, organic, or gluten-free. The biggest debate happens to be the toppings. Cheeses, leafy greens, glazes, protein, and dare we say it?....pineapple (fruit.)
Crust/Dough: Crust types have really taken off. Deep dish, thin crust, thick crust , stuffed crust, sourdough, cauliflower - pick your poison! Throughout the Book we will refer to the following types of dough.
- Artisan: homemade dough
- Pre-made dough: from the bakery, pizza shop, or grocery store
- Frozen/refrigerated pizza: from the grocery store
COOKING METHODS
One thing that is universal with all cooking methods is making sure you pre-heat your surface. Your oven, pellet grill, (whatever you're using) should be hot before putting your pie in.
CONVENTIONAL OVEN
By far the most popular method would be a tried-and-true frozen pizza in the kitchen oven. Typically set around the 375-450F°mark and baking for upwards of 20 minutes. For a more authentic dine, try making homemade pizzas on a pizza stone. The stone will offer a more even cook while absorbing moisture. If you're a conventional oven-er through and through we might suggest you take a look at our Camp Ovens to allow you a portable pizza cooking option.
ARTISAN & PIZZA OVEN
If you're any sort of pizza connoisseur you're no stranger to pizza ovens or artisan ovens. We happen to sell these as both a standalone unit and as a cook system accessory. Both come standard with a pizza stone like we mentioned above. As your know, the stone absorbs excess moisture, while the dome-shaped ceiling mimics the same heating pattern as a brick oven. Our line of portable Artisan Pizza Ovens allows you to bake pizza wherever your cook system is set up. Pre-heat on med-low (you will rarely use the high heat setting), once pre-heated, the pizza stone's temperature will gradually equalize to eventually become hotter than the internal air temperature. Dough thickness and dough types (above) will dictate the temperature and the duration.
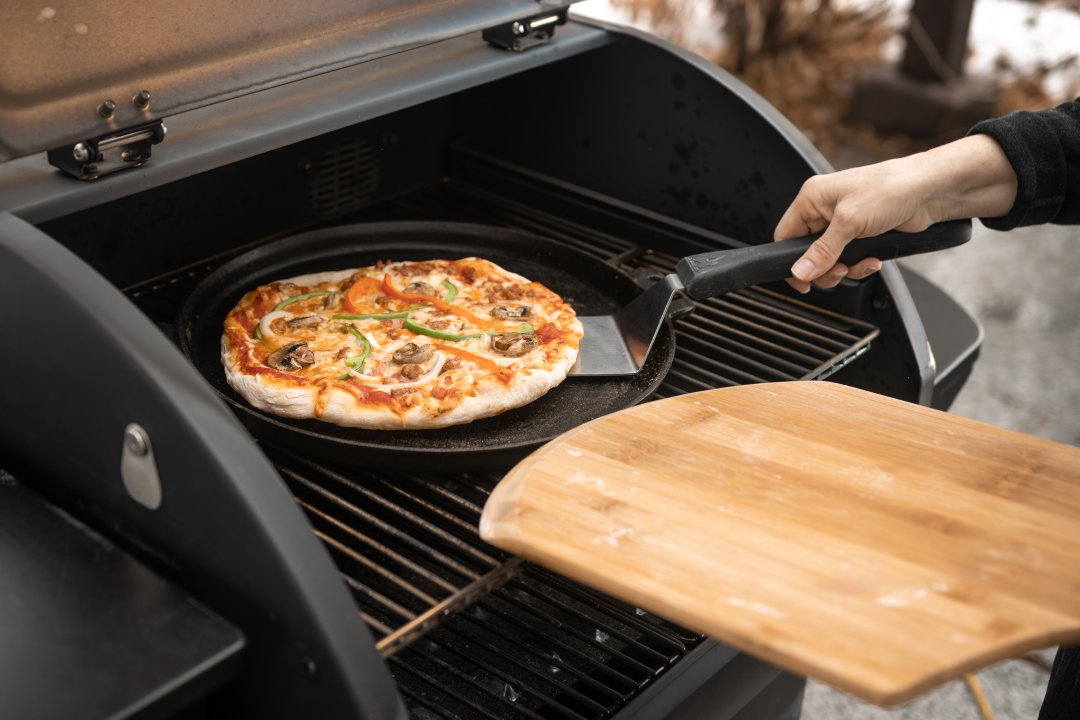
PELLET GRILL
Smoked pizza in the pellet grill is likely a cooking method you haven't tried yet. For frozen or ready-to-bake pizza's, follow the cooking instructions like normal. Place the pizza on the top rack and rotate regularly until fully cooked. You can also pick up a pizza stone if you don't have one already and place that on the bottom rack of your pellet grill. Again, this will absorb the dough's moisture and promote an even cook.
Pro Tip: The pizza stone will fit in our pellet grills, in your kitchen oven, and your outdoor camp oven line.
WOOD


THE DOUGH

We always say 'fresh is best' and that's just what we plan to give you. It wouldn't be The Book of Pizza without a handmade dough section. Get your flour ready, folks.Ingredients:
- 3 cups of warm water
- 4 teaspoons of active dry yeast
- 4 teaspoons salt
- 4 cups of all-purpose flour
- 2 ½ cups of bread flour
Instructions
Grab a large, clean bowl to make and hold the dough in. Add your warm water into the bowl. Followed by the yeast, salt, then flour. Mix well. The dough should be firm but slightly sticky. Let this proof until it doubles in size (about 1 hour.) Next, we shape the dough into balls or put in the fridge until ready to use. When you're ready to use it, scrape the dough out of the bowl and shape into 6 dough balls, each the size of a large orange. Let them rise at room temperature for 30 minutes if not chilled or about 2 hours if chilled.The requirement of bread flour in this recipe is essential. This will allow you to stretch the dough thin. So much so, that you'll find that a rolling pin is not necessary. The dough will be more wet than normal dough, this is okay-in fact, it's better. This will give you those authentic air pockets in your crust! We recommend keeping a small bowl of flour nearby to help you handle the sticky dough. Flatten and stretch the dough to form the crust. Do this by carefully stretching the dough or tossing! Once you're happy with the shape, you can define the outer crust (the lip around the edge.)Pro Tip: Refrigerated dough can last up to 3 days in the refrigerator. In fact, the dough is much easier to handle after being chilled in the fridge.
TOSSSING
Tossing is a lot of fun to watch. But is it necessary? Tossing your pizza shapes and lengthens your dough without having to use your fingers or a dough sheeter. You'll avoid tears and a dry crust. On a more scientific level, while mid-flight, the air reacts to the dough and dries it out just enough so it's easier to handle. You'll avoid the stick and adding an excessive amount of flour.To do this, your non-dominant hand will be curled into a fist, while your dominant hand will be an open palm. Support the pizza with both hands by draping the dough across. Rotate your throwing arm inward, then outward in a quick, spring-like motion (similar to spinning a basketball on your finger tip.) Catch the dough in the same palm/fist position as you started. Continue to toss until you've reached your preferred pizza size. If you need some extra tossing help, take a look at our Helpful videos below!
THE SAUCE

Fresh is always best-same goes for the sauce! You can go the pre-bottled route, but an authentic pizza joint will make their own pizza sauces. Go for high quality ingredients over any fancy add-ins. If you find yourself getting too lost in the sauce, any homemade recipe will do if it includes sauce staples like basil, oregano, olive oil, and crushed tomatoes.
Ingredients:
- 1 can of crushed tomatoes
- 3 tbs of extra virgin olive oil
- 1/2 tsp salt
- 1/2 tsp dried oregano
- 2 fresh basil leaves
- 1 clove of minced garlic
Instructions: Pour tomatoes into a mixing bowl. If they aren't crushed, crush them. Add in the rest of the ingredients. Stir to combine. It's that simple!
Pro Tip: when adding to your pizza, go light the first round and add more as needed. You won't want to drown your pizza in sauce.
THE CHEESE
We don't want to over-complicate a good thing. Mozzarella is always a good place to start. However, mozzarella can be rather bland. You can try adding one more cheese flavor to the mix like provolone or cheddar cheese.
Pro Tip: Don't add parmesan cheese to the mix just yet. It's a dry, hard cheese that won't melt well, and can easily be ruined by high heat. Instead, garnish an already cooked pizza with grated parmesan.
THE TOPPINGS
It's time to assemble your team! A common mistake is overdoing the toppings. The more toppings you load on, the slower the pizza will cook. For thin-crust pizzas, try keeping it to 2-3 toppings (not including your cheese.) Some of our favorites are: Basil leaves, sausage, pepperoni, chicken, bacon, pulled pork, mushrooms, onions, olives etc. But hey, don't let us hold you back! Dessert pizzas anyone? Try coconut, chocolate, caramel, pecans, apples, more.

TIME + TEMP
Always, always, ALWAYS pre-heat your pellet grill or pizza oven before use.
Frozen / Ready-to-bake / Pre-made dough
Like we said above, when cooking a frozen or ready-to-bake pizza, follow the included cooking instructions for the best results. The pizza stone or pellet grill should be around 375-420F. Keep an eye on the bottom of the crust as most cooking units (yes, even your home oven) have hot spots. Use your pizza spatula to rotate the pizza as needed on the cooking surface.
Artisan / Homemade
You'll see this almost everywhere; homemade pizzas need to be cooked at a high temperature. Much higher than you'd expect. As for thin-crust Artisan pizzas, cook at 500-550°F for about 4-7 minutes. (This is a starting point.) Again, always monitor the pizza. A thicker crust and more toppings will require more time. Stretched or hand-tossed, thin doughs will cook faster at higher temperatures.
Deep Dish
Homemade with many toppings/Deep Dish will need to cook around 375-420°F for a longer period of time.
Pro Tip: Pick up an infrared thermometer to get an accurate read of the pizza stone.
RESTING
Pre-Cook: We touched on this above, but during the dough formation process, the dough absolutely needs to rest.
Post-Cook: We've all been there...the painstaking moment after biting into a pizza slice far too early. For safety reasons, let it cool down a few minutes before serving.
SLICING

Create perfect slices with ease using the Rocking Pizza Cutter. Thin crust, deep dish-you name it! If you're breaking a sweat using a pizza wheel to slice it up for the crew...you're doing it wrong! With the 14-inch rocker you'll serve up crisp edges. Plus it's easy to clean.
Most slicing ends up in the traditional triangle pizza slice. But, slice however your heart desires—no right or wrong way.
Serving
America's favorite comfort food can be enjoyed alone or consumed with a variety of options to round out the meal. Try offering a light side salad or bread sticks.Sauces such as ranch can be used for dipping or serving. A light drizzle of a balsamic glaze is an elegant way to bring more flavor to your homemade pizza. And of course, we can't forget a healthy sprinkle of freshly grated parmesan cheese to top off the pizza pie.
STORING + LEFTOVERS + REHEATING
Don't toss your leftover pizza! Stack them on top of one another placing a layer of wax paper/foil/parchment paper between the slices. Wrap the entire stack in plastic wrap and place in a refrigerator lower than 40°F for up to four days.To reheat a refrigerated pizza, you might be surprised to know that the stove-top is one of the best ways. Add a couple teaspoons of water to a medium heat skillet, place your slices in, and cover. Let it cook for a few minutes (add more water as needed) and enjoy!
A CAMP CHEF PIZZA
Camp Chef has a variety of products that help make pizza smoking seamless. Pick up the 26-inch Bamboo Cutting Board for chopping toppings, making dough, and slicing your pizza. All of our pellet grills have the capacity to smoke a pizza-even the Pursuit! Long cooks may result in excess grease so pick up a pack of pellet grill grease bucket liners for easy cleaning.
A Camp Chef style pizza means more than just using our products-it also provides a sense of community. If you're on Facebook and have a Camp Chef pellet grill, join this customer-ran pellet grill group called Camp Chef Smoker Smokers.